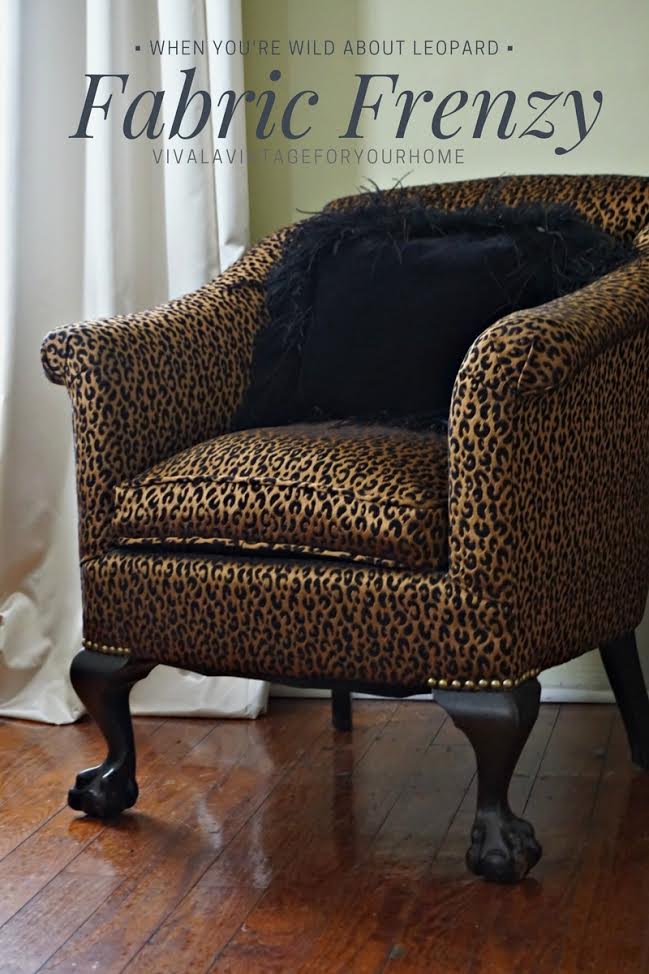
When I found the fabric for this chair makeover, who knew I would love it so much I’d want it around the house!! I used it to cover some vintage books to display on the etagere I made a pillow for … Continue reading
When I found the fabric for this chair makeover, who knew I would love it so much I’d want it around the house!! I used it to cover some vintage books to display on the etagere I made a pillow for … Continue reading

While everyone is displaying all the pretty mums, pansies and lilacs for fall, I’m still admiring my Forever Hydrangea plant. While I lived up north, I was never the green-thumb gardener, but I remember falling in love with the Hydrangea flowers. I would pass by houses with the beautiful blue, purple, green and mauve color bushes and say to myself “one day I’ll have those”. I have to admit – I use to wait till night fall to sneak and clip a few – like a bandit in the night wearing a handkerchief and baseball cap ..(lol- I know- shame on me). When I moved south, those were the first things I planted. Needless to say the first couple of years I was not very successful at growing them. So I kinda gave up. But throughout the years, one bush managed to stay strong. I couldn’t believe it and I’m just tickled pink happy. With all the rain, this one bush, which is planted right outside my bedroom window, is still blooming. Every morning after I rise, I take a peak just to catch a quick glance at my beautiful blossom buddies.
Last week, I decided to take advantage and clip a few to dry out, so I can enjoy them until next summer. To dry hydrangeas where they’ll maintain color is really simple.
FIRST: Cut a few of your beautiful blooms to display in a favorite vase. Only cut the ones that have fully blossomed and appear to be almost dry (sort of like soft paper). Remember to cut at a slant and lightly shake off the bugs. Remove the green leaf – I left a couple on near the very top. My first batch came to work with me to brighten my desk area. The cute tray was a DIY you view here

The second batch was placed on the bar cart for some added color (can you believe how colorful they are in November??!)

SECOND: Add water, but only about an inch up. You don’t want the stems too deep in the water. As the water slowly evaporates, the drying process will begin. Once the water has completely evaporated, and the flowers feel dry, leave them in the vase for another day or two (or until the stems are completely dry). This will take about 2-3 weeks so be patient and enjoy the color.
THIRD: Your dried beauties are ready to be display in a fall basket:

Or create a bouquet. Here I added them with pecans in a vase

The petals tend to darken a bit as they dry, which adds to the fall richness. The olive green and lilac combinations are perfect fall accent colors.

Or use them with a fall centerpiece, like here: I just added them on the corner of my simple table display.

These have the green and mauve tone colors which again, are rich with fall colors.

I couldn’t be more pleased with the having them lingering around my house till next year. It’ll only remind me of how summer is to come.

So if you have a hydrangea bush still blooming, go ahead, pick a few to bring inside to create your own display. I hope this post was helpful in drying out your flowers. Until next time – continue to enjoy the Fall-bulous season. Smooches!

Hey Y’all! Real quick question— Have you noticed how much stripe taper candles cost.. Geez louise… look here and here.. and World Market has them on sale for $3.00 but that’s for a pair. Well, remember the yard sale I went to a couple weeks ago .. I also found 3 boxes of tapered evening candles for $0.50 a box with 5 candles in each box.

You know I snagged all of them. I knew exactly what I wanted to do .. Stripe them out!! It was so quick and easy and I love how it gave them a bit more elegance.

All I did was tape them up and gave a quick spray of metallic gold. Let dry and now I have a pair of striped gold candles. I saved a few dollars by getting vintage candles from the yard sale and doing it myself. The best part is I’ve got several candles to make different colors and styles with at a fraction of the cost.

So the next time you’re at a yard sale, a thrift store or even Goodwill.. get those candles! Every little bit savings counts.


Another thrifty idea by your Urvintage Girl! Tah-tah!!
In this blogging world we all come across others who inspire us to try a project. Such is that with Linda over at LindaGLovingHome. Linda is so talented with creating beautiful things for the home and she has really blown me away with her many table runner designs. When I saw her Fall Harvest runner, I became instantly inspired to try to make one. She was kind to send me a pattern so I gave it a whirl. This is the inspiration design I absolutely adored.

Simply gorgeous, and I love how she mixes pattern designs while adding a few detailed touches. You can see all her other beautiful designs here. It’s worth taking a visit to her blog. After I finished my dining room makeover, I realized this table could use a new runner. I’ve had this runner for years and think it’s time to give it a rest.

Now -I’m by far- no means a seamstress,just at the beginner stages when I made this table runner

I finally had the opportunity to go fabric shopping – (I was a kid in the candy store – wanting everything)
This is my new runner:
I made it a bit longer just in case I want to use it for the dining table. I really love the color and pattern which brightened up this area

I goofed big time on the scalloped end.. (don’t ask how mine came out in this totally different shape..lol)

But all in all – I’m pretty happy about the outcome.

Instead of using regular lining, I used the back of the fabric so I have the option for another look when I flip it over.


Ok guys.. I’ve tried my luck at this, next up is a bed runner..- she makes fabulous ones.. so I have to give that a try.. Thanks Linda for the inspiration! Fingers crossed.
Hey, Hey!! It’s your thrifty girl here.. First off, I want to say thank you to all those who voted for me in the Krylon Paint #miycontest. This past week- that was the only thing on my mind, and thanks to your help I took 3rdplace – whoohooo – My goal was 1st place, but better luck next time for me.
now that’s over with, I finally decided on the look I wanted for the 4th and final tray. Remember a few weeks back I started on the makeover of these four cranberry trays:

Here are three of the new looks


This Jonathan Adler tray retails for $150.00 – no offense- but REALLY??? smh…
It’s very similar to these Pier 1 trays that I got for $5.00 ea during a clearance sale years ago

and this Pottery Barn (looks for less) sells for $29.95

I fell in love with the glossy white, so I sprayed it with two coats of Rustoleum glossy white. I also added a special touch to it. Oh sure, I still have plenty of the wallpaper samples, but for this one I decided on shelf liner paper. It’s durable, wipeable, and beautiful.

Here is the finished look for the tray

Hand-painted the edges with Martha Stewart Metallic Gold for that extra Midas touch

The vintage gold-rim glasses are the perfect touch for this serving tray


So now it’s “Tres Chic”

Has anyone decided to do a tray makeover yet?? If so… please share…
These tray designs are also featured in my Steller Story