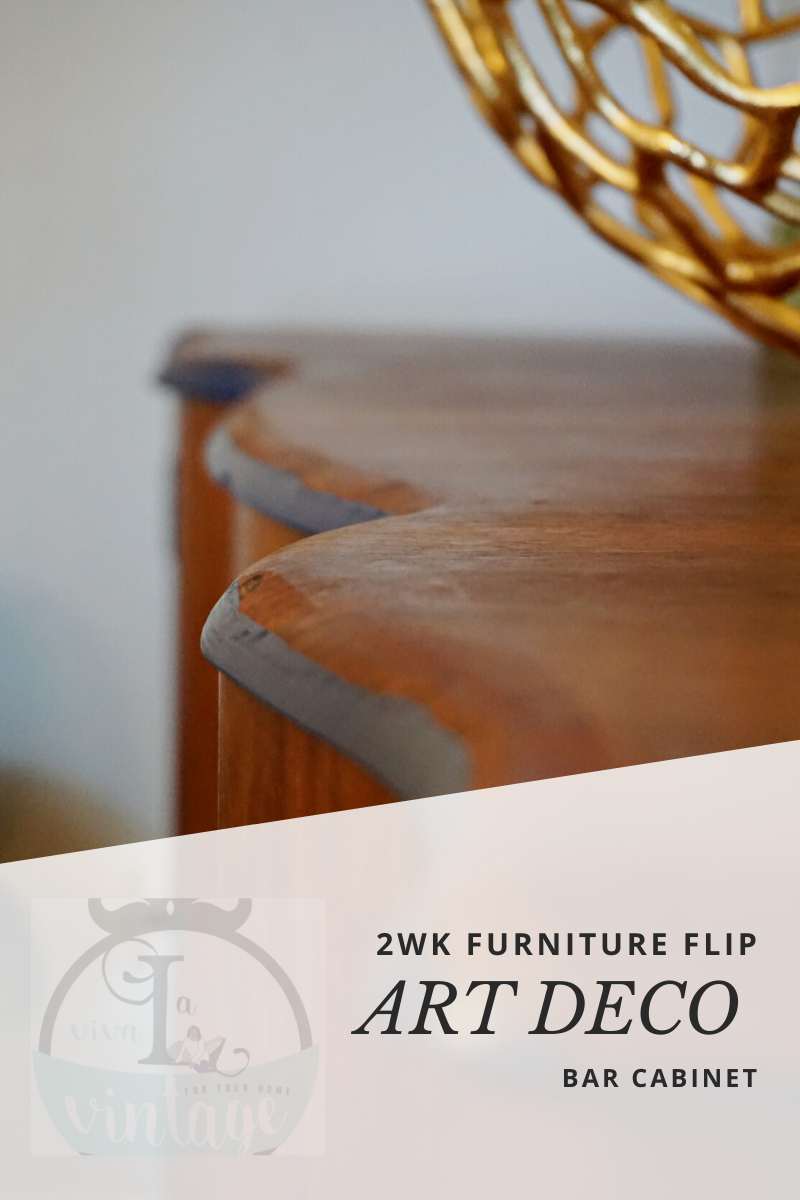
Restoring an Art Deco Bar Cabinet Good morning everyone!! Well today is the reveal day of my piece I chose to work on for the 2wk furniture flip hosted by Nicole at Design_it_Vintage. Along with Nicole and myself, there were … Continue reading
Restoring an Art Deco Bar Cabinet Good morning everyone!! Well today is the reveal day of my piece I chose to work on for the 2wk furniture flip hosted by Nicole at Design_it_Vintage. Along with Nicole and myself, there were … Continue reading

We’re in our new decade and there’s plenty to be happy about. Not only will each of us be celebrating entering another decade of life, but if you’re into art deco (like me), we’re celebrating the 100th birthday this … Continue reading

Hey all! I hope you’re doing well and feeling great! I’m so happy Spring is here and I’m almost complete with my indoor projects because it’s time to be outside. So I’m working on two projects at one time.. The Foyer and the Master bedroom. The bedroom refresh is complete.. I chose not to paint because I painted about 3 years ago. (Besides, I don’t want my brother to strangle me…lol). But, I will say just changing a few items and rotating two pieces of furniture not only gave me more space, but I was able to add two more pieces and the room appears more spacious. Hubby thought I took something out.. (Chuckles, Goes to show how much he really pays attention.. Smh). Since this stuff doesn’t phase him much, I hope you’ll sit, relax, sip and enjoy the view of our vintage suite (a girl can dream right ?)

Everytime I think about switching our furniture to something more modern, my inner being just can’t part with this set. I love the bed plus it was custom stained for me. I spotted it in a pile of unfinished work and it had been stripped and a few of the embellishments were missing. My dear friend Joyce was the craftswoman behind this creation. I brought her the drawer of my nightstand and asked her to match the bed stain. When she finished it I’ll never forget how excited I was to see how beautiful the bed looked.

So, that’s my bed story, it’s been with me for almost 20 years and I dont’t think I’ll ever change it. Now moving along, it was an extremely bold move to choose white as my scheme, because my husband is an auto mechanic..(eeeeek..). But when I snagged the crochet coverlet at an estate sale (for $30.00.. what a deal) I knew I wanted to accent it with white. I later found the fur bedspread at another estate sale for $20.00.

I found the the perfect white pillows at HomeGoods, except the purple one.. That’s my special pillow (read here), which is why I chose to paint the headboards purple, because that pillow will always sit on our bed.


Last year I had them monogrammed, but they hung on the wall as window toppers..(see here) Well I’m super excited because they’re actually cornice boards now. Me and my upholsterer worked together and crafted the ends to extend the width, then attached to more wood. This was not a hard project, but it did take time. (kick me in the butt for not taking pics along the way, but you can see some below


I picked out a fabulous champagne color satin fabric for the panels and she made the pleated panels and we attached with Velcro. The sheer panels are equally beatiful., they are embellished with a satin circular pattern. They are on extension rods inserted inside the cornice board. I knew the design I wanted and working with her, it was awesome to see we the accomplished look and I honestly love them. So, if you’ve got or saw some cute twin headboards, here’s a DIY project, designed by yours truly.

(You see why I have the purple pillow)


Sheba came in here for hubby’s dressing corner.


The satin panels are so soft, they actually feel like a designer ball gown. The lucite bedside lamps were purchased from HomeGoods. They were marked down to $25.oo and were perfect for my “vintage glam” design.

Do you notice the beauty of the crochet coverlet.. I still haven’t found the right nightstand, so the hat boxes still serve as nightstand/storage.

I made up my mind to not keep my dresser cluttered. It took some time, but, I actually went through all the jewelry I don’t wear, got rid of receipts and the other “stuff” I tend to throw on there. I want to keep it simple.. This vintage candy dish has always been a favorite of mine. My grandmother (and I’m sure many of yours) had one on the coffee table, and I always liked it. I chose to use mine as powder puff jar.. It fits perfectly


Yea, I kinda feel like a starlet when I use it.. (Giggles… Hey I’m still dreaming)

A picture of my besties stay close by too.. The french ladies chest was another antique find I purchased from my friend Joyce some 20 years ago too. I can’t say enough how she had so many gorgeous pieces. This holds the organized jewelry clutter (gorgeous piece isn’t it) . The antique brocade slipper chair was a sidewalk special.. You can see the before/after here.

My vanity (which I call glamour girl station ) adds to the vintage glam feel of the room.. After all, there’s one in the boudoir of all the Turner Classic movies – so, I have to have one in mine ☺️

When my nieces visit, they love playing dress up in front of this, I have to keep my eye on them or they’d have the room lit up with perfume. The vanity chair got a new look as well…


For a girl with a chair fettish, I came across this cute little lighter and was nice to have just for show – (not a smoker). The only thing I’m still contemplating is taking down my dolls. I haven’t found anything to replace them so, I just decided to keep them out a little longer.


Our room doesn’t have a certain era of furniture pieces, but they’re all blended. That’s mostly the advantage of working with antiques. I’ve never been the matchy-matchy kind of person, so, this allows me to use Victorian, French, Art Deco, midcentury and new items to complete the look of the Vintage Glam bedroom suite. I hope you enjoyed the “fresh” new glam look.

You see, there’s beauty in vintage and I truly adore working with them. If you ever decide you want to incorporate a bit of vintage into your decor and feel stuck.. Feel free to ask me for a bit of advice.. I’d love to help.

I found the right mirror, so, the doll has been retired.

As always .. beauty doesn’t have to cost a fortune. Happy hunting and enjoy thrifting your House into a Home

Thanks for stopping by! Smooches

I’m running a bit behind on a few posts, but, remember a few weeks back I had the house powerwashed? I want to show you the before picture of my side porch.

I know.. YUCKKKKK!!! See the big discoloration and dirty gray???
This is after the powerwash… This is a big difference.. I still need to paint the steps… but that’s another project.. at least the porch looks cleaner and brighter.

I’m glad we had that done.. At least now I can continue to spruce up the side porch. Remember the vintage rattan chair I picked up for $10.00 last year..( I know..I waited longer than I wanted to change that hideous fabric), this chair was a steal! The average price of these suckers are about $199.99 (see here)I love the shape and look of it.


Since the porch is all clean, it’s time I update her look. The cushion was recovered with an inexpensive outdoor fabric ($6.00). A trip to Goodwill paid off because I snagged two pillows for $2.00 ea. Washed the dust off and this is the new corner area for my side porch.

The Franco Albini rattan ottoman (circa 1950 was gifted to me) is the perfect match for this chair.

After digging deep it the basket barrels at Goodwill, I couldn’t believe I found these – in perfect condition- and they match!

Scrap fabric from the cushions here was used to make the ties for the seat cover


The corner now has a modern, yet, vintage charm – and I love it 🙂

This week – I hope to choose the right color to paint the swing and this side porch will be completed. Yayyyyy!!!
I’m so excited, I finally got “W” monogrammed on the twin headboards- turned window treatment that were above the master bedroom windows. They’ve been plain for a while waiting for me to get my nerves up to try doing it myself.

A few weeks back our town had an auction and few people donated some items for the charity event. There were a pair of painted Palmetto tree wine glasses donated for the silent auction. They were really nice and I was told a local artist painted them. Come to find out the talented artist has a shop right across the street from my house (duuuhhh) boy did I overlook that hidden jewel. I’m going to introduce you to Ms. Peggy Brickles very soon. But moving along with my excitement. I asked her if she does stenciling and she sure does! So I picked out the letter and gave her a feel of how I want it to look. Thank God she read my mind…. 🙂 which I believe is part of the hidden perception of what artists do.. they visualize what you’re trying to convey and bring it to fruition. OK – So.. down comes the headboards (omg! can you say dust – chuckles… ah-choo, ah-choo) and I took them to her (dust free of course) for her to work her artist magic on them. A couple of days later I get a texted picture of the finished product and my jaw dropped.. PERFECT!!!! It was exactly what I wanted… I couldn’t wait to pick them up. This is how they turned out.


Didn’t she do a FANTASTIC job! I applaud Peg for putting the cherry on top of my unfinished sundae (so to speak). I got them home and up they went..


Even the hubby liked them..